Using the UConn Xanadu cluster
Up to the Phylogenetics main page
The UConn Computational Biology Core is part of the Center for Genome Innovation (CGI). We will use the Xanadu computing cluster located at the UConn Health Center for most of the data crunching we will do in this course. By now, you should have an account on the cluster, and today you will learn how to start analyses remotely (i.e. from your laptop), check on their status, and download the results when your analysis is finished.
Make note of your username
| Name | Username |
|---|---|
| Akriti | eeb5349usr1 |
| Brenden | eeb5349usr2 |
| Chelsea | eeb5349usr3 |
| Crystal | eeb5349usr4 |
| Danielle | eeb5349usr5 |
| Elena | eeb5349usr6 |
| Ellie | eeb5349usr7 |
| Jensen | eeb5349usr8 |
| Mandy | eeb5349usr9 |
| Maurice | eeb5349usr10 |
| Noah | eeb5349usr11 |
| Savanna | eeb5349usr12 |
I will let you know the password at the beginning of lab.
Obtaining the necessary communications software
You will be using a couple of simple (and free) programs to communicate with the head node of the cluster. What programs you use depends upon whether you are going to be using Windows or MacOS.
If you use Windows
The program Git for Windows provides a terminal that will allow you to communicate with the cluster using a protocol known as SSH (Secure Shell). We will not actually use the “git” part of “Git for Windows”, although it is there in case you need it later. Instead, you will use the Git for Windows bash shell to send commands to the cluster and see the output generated.
Visit the Git for Windows web site, press the Download button, and install Git for Windows on your system. Once installed, open Git BASH from the All Programs section of the start menu. This will open a terminal running the bash shell (a shell is a program that interprets operating system control commands) on your desktop.
If you use Mac
Start by opening the Terminal application, which you can find using the Finder main menu in Go > Applications > Utilities. You may wish to (later, after this lab) install iTerm2, which is a terminal program that makes some things easier than Terminal, but the built-in Terminal will work just fine for today.
SSH
The program ssh will allow you to communicate with the cluster using a protocol known as SSH (Secure Shell). You will use ssh to send commands to the cluster and see the output generated.
Type the following command into your terminal window:
ssh username@xanadu-submit-ext.cam.uchc.edu
where username should be replaced by your username on the cluster.
SCP/SFTP
An SCP or SFTP client is needed to to transfer files back and forth using the Secure Copy Protocol (SCP) or Secure File Transfer Protocol (SFTP). I will show you how to transfer files using both methods, but for now you should go ahead and install Cyberduck. Cyberduck provides a nice graphical user interface, but you might find that the command line clients let you get your work done faster once you get used to using them.
Learning enough UNIX to get around
I’m presuming that you do not know a lot of UNIX commands, but, even if you are already a UNIX guru, please complete this section anyway because otherwise you will fail to create some files you will need later.
ls: finding out what is in the present working directory
The ls command lists the files in the present working directory. Try typing just
ls
If you need more details about files than you see here, type
ls -la
instead. This version provides information about file permissions, ownership, size, and last modification date.
pwd: finding out what directory you are in
Typing
pwd
shows you the full path of the present working directory. The path shown should end with your username, indicating that you are currently in your home directory. If you are using one of the students accounts, e.g. eeb5349usr10, then the directory path will end with eeb5349/usr10, not eeb5349usr10.
mkdir: creating a new directory
Typing the following command will create a new directory named pauprun in your home directory:
mkdir pauprun
Use the ls command now to make sure a directory of that name was indeed created.
cd: leaving the nest and returning home again
The cd command lets you change the present working directory. To move into the newly-created pauprun directory, type
cd pauprun
You can always go back to your home directory (no matter how lost you get!) by typing just cd by itself
cd
If you want to go down one directory level (say from pauprun back down to your home directory), you can specify the parent directory using two dots:
cd ..
nano: creating the run.nex file
One way to create a new file, or edit one that already exists, is to use the nano editor. You will now use nano to create a run.nex file containing a paup block. You will later execute this file in PAUP* to perform an analysis.
First use the pwd command to see where you are, then use cd to go into the pauprun directory if you are not already there. Type
nano run.nex
This will open the nano editor, and it should say [ New File ] at the bottom of the window to indicate that the run.nex file does not already exist. Note the menu of the commands along the bottom two rows. Each of these commands is invoked using the Ctrl key with the letter indicated. Thus, ^X Exit indicates that you can use the Ctrl key in combination with the letter X to exit nano.
For now, type the following into the editor:
#nexus

begin paup;
    log file=algae.output.txt start replace flush;
    execute algae.nex;
    set criterion=likelihood autoclose;
    lset nst=2 basefreq=estimate tratio=estimate rates=gamma shape=estimate;
    hsearch swap=none start=stepwise addseq=random nrep=1;
    lscores 1;
    lset basefreq=previous tratio=previous shape=previous;
    hsearch swap=tbr start=1;
    savetrees file=algae.ml.tre brlens;
    log stop;
    quit;
end;
Once you have entered everything, use ^X to exit. Nano will ask if you want to save the modified buffer (a buffer is a predefined amount of computer memory used to store the text you type; the text stored in the buffer will be lost once you exit the program unless you save it to a file on the hard drive), at which point you should press the Y key to answer yes. Nano will now ask you whether you want to use the file name run.nex; this time just press Enter to accept. Nano should now exit and you can use cat to look at the contents of the file you just created:
cat run.nex
Important when you use the cat command, be sure to specify a file name, otherwise cat will hang, expecting you to type something. That is, don’t type cat and then hit return. If you do get stuck and cat is waiting for you, you can get out of it by typing Ctrl-D.
Create the gopaup file
Now use nano to create a second file named gopaup in your pauprun directory. To do this, type pwd to make sure you are in the pauprun directory, then type nano gopaup. This file should contain this text:
#!/bin/bash
#SBATCH --partition=general
#SBATCH --qos=general
#SBATCH --job-name=pauprun
#SBATCH --mail-type=END
#SBATCH --mail-user=<your name here>@uconn.edu
cd $HOME/pauprun
module load paup/4.0a-166
paup -n run.nex
IMPORTANT Please be sure to replace the phrase <your name here> with your name to create a valid email address!
You may not wish to use the two lines that begin with #SBATCH –mail-type= and #SBATCH –mail-user=. If you don’t want email notifications cluttering your email inbox, just delete these two lines from the file (they are not required).
Getting files onto the cluster
The next three sections describe three different ways to get a file into a directory on the cluster. If the file is located on a website, which is the usual case for labs in this course, I would use the curl method. If you don’t like that method, or if the file you need to transfer is located on your local computer and not a web site, the other two sections offer alternative ways (both of which involve first getting the file onto your local computer, then uploading it to the cluster).
Using curl to download the algae.nex data file to the cluster directly
One of my favorite methods to transfer files that are stored on a web site involves the program curl (which stands for copy url). The following command should be carried out in a terminal that is already logged into the cluster.
In your terminal, navigate to the directory where you want to save the file (on the cluster). Use this command to download the algae.nex file directly into the present working directory on the cluster:
curl -Ok http://hydrodictyon.eeb.uconn.edu/people/plewis/downloads/algae.nex
The -O tells curl to save it under the same file name (algae.nex) that it has on the remote server. If you forget the -O, curl will just spit out the entire contents of the file to your terminal, which is almost never what you want! The k in -Ok tells curl to go ahead even if it does not recognize the security certificate issued by the server hydrodictyon.eeb.uconn.edu. Hydrodictyon uses a valid InCommon SSL certificate generated by UConn UITS, but InCommon is not recognized by the curl program on Xanadu.
If this method worked, skip now to the section A few more UNIX commands
Using Cyberduck to upload the algae.nex data file
(You can skip this section if the curl command worked for you.)
Download the file algae.nex and save it on your hard drive.
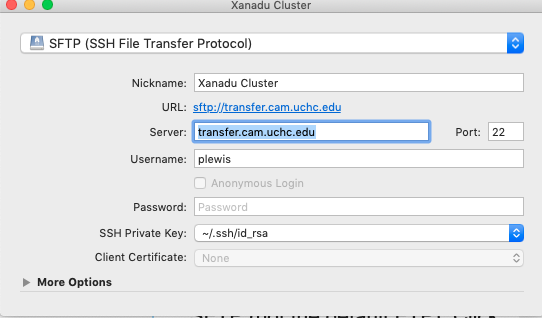
Open Cyberduck, choose Bookmark > New Bookmark from the main menu, then fill out the resulting dialog box as shown on the right (except substitute your own user name, of course). Be sure to change the protocol to SFTP (not the default FTP). Click the button to close the dialog box and you should see your bookmark appear at the bottom of the main window. Double click the bookmark to open a connection. You will then be warned that the host key is unknown - choose Allow (and go ahead and check the Always button so you do not need to do this every time.
Once you are in, you will see a listing of the files in your home directory on the cluster. To copy the algae.nex file to the cluster, you need only drag-and-drop it onto the Cyberduck window.
If this method worked, skip now to the section A few more UNIX commands
Using scp to upload the algae.nex data file
(You can skip this section if either the curl command or Cyberduck worked for you.)
Download the file algae.nex and save it on your hard drive.
The following should be carried out in a terminal that is not already logged into the cluster.
In your terminal, navigate to where you saved the file (on your local Mac or Windows computer). If you saved it on the desktop, you can go there by typing cd Desktop.
If you’ve made a shortcut in your .ssh/config file, you can use the following command to upload the algae.nex file to the cluster:
scp algae.nex xfer:
If you have not made a shortcut, use this command instead:
scp algae.nex username@transfer.cam.uchc.edu:
where username should be replaced by your own user name on the cluster. (Don’t overlook the colon on the very end of the line!)
A few more UNIX commands
You have now transferred a data file (algae.nex) to the cluster, but it may not be in the right place. Use the pwd and cd commands to ensure that you are in the pauprun directory, then type ls to see if the algae.nex file is there. The run.nex file contains a line containing the command execute algae.nex, which means that algae.nex should also be located in the pauprun directory.
mv: moving or renaming a file
If algae.nex is in your home directory, you can use the mv command to move it to the directory pauprun:
cd
mv algae.nex pauprun
The mv command takes two arguments. The first argument is the name of the directory or file you want to move, whereas the second argument is the destination. The destination could be either a directory (which is true in this case) or a file name. If the directory pauprun did not already exist, mv would have interpreted this as a request to rename algae.nex to the file name pauprun! So, be aware that mv can rename files as well as move them.
cp: copying a file
The cp command copies files. It leaves the original file in place and makes a copy elsewhere. You could have used this command to make a copy of algae.nex in the directory pauprun:
cp algae.nex pauprun
This would have left the original in your home directory, and made a duplicate of this file in the directory pauprun.
rm: cleaning up
The rm command removes files. If you had used the cp command to copy algae.nex into the pauprun directory, you could remove the original file using these commands:
cd
rm algae.nex
The first cd command just ensures that the copy you are removing will be the one in your home directory. The variable $HOME holds the path to your home directory. The symbol ~ is shorthand for $HOME. Typing cd by itself, cd ~, or cd $HOME all change the present working directory to $HOME.
To delete an entire directory (don’t try this now!), you can add the -rf flags. The r flag tells rm to recursively apply the remove command to everything in every subdirectory, while the f flag means force (don’t ask whether each file should be deleted in each subdirectory, just do it!):
rm -rf pauprun
The above command would remove everything in the pauprun directory (without asking!), and then remove the pauprun directory itself. I want to stress that this is a particularly dangerous command, so make sure you are not distracted or sleep-deprived when you use it! Unlike the Windows or Mac graphical user interface, files deleted using rm are not moved to the Recycle Bin or Trash, they are just gone. There is no undo for the rm command.
Starting a PAUP* analysis
The next tutorial you will explore in lab today will introduce you to the software PAUP*, but for now we will do a short analysis using this program just to demonstrate how to submit a job to the cluster. There are two ways to run analyses on the cluster:
- use sbatch to submit a batch job
- use srun to start an interactive session You would normally use the interactive session approach if you are just experimenting or are making sure that a program will start successfully. For a phylogenetic analysis that may take some time, you almost always want to submit it as a batch job (see below). The beauty of batch jobs is that you can close down your connection to the cluster and reconnect later (after the system sends you an email telling you that your run is finished).
If you’ve been following the directions in sequence, you now have three files (algae.nex, run.nex, and gopaup) in your $HOME/pauprun directory on the cluster. Use the pwd command to make sure you are in the $HOME/pauprun directory (use the cd command to get there if not), then the cat gopaup command to look at the contents of the gopaup file you created earlier. You should see the following (except that <your name here>@uconn.edu should now be your UConn email address):
#!/bin/bash
#SBATCH --partition=general
#SBATCH --qos=general
#SBATCH --job-name=pauprun
#SBATCH --mail-type=END
#SBATCH --mail-user=<your name here>@uconn.edu
cd $HOME/pauprun
module load paup/4.0a-166
paup -n run.nex
This file will be used by software called SLURM to start your run. SLURM provides a command called sbatch that you will use to submit your analysis. The SLURM sbatch command will look for a core (i.e. processor) on a node (i.e. machine) in the cluster that is currently not being used and will start your analysis on that node. This saves you the effort of looking amongst all nodes in the cluster for a core that is not busy.
Here is an explanation of each of the lines in gopaup:
- The 1st line specifies the command interpreter to use (just include this in your scripts verbatim).
- The 2nd, 3rd, and 4th lines begin with
#SBATCHand are interpreted as commands by SLURM itself. In this case, the first and second#SBATCHcommands tell SLURM to use the general partition (--partition=general) and the general quality of service (--qos=general). You should always include these two lines verbatim. The last#SBATCHline gives a name to your job (--job-name=pauprun). You could changepauprunhere to something else, but keep your job names short and without embedded spaces or punctuation. The job name will help you identify your run when checking status. - The 5th line is simply a
cdcommand that changes the present working directory to the pauprun directory you created earlier. This will ensure that anything saved by PAUP* ends up in this directory rather than in your home directory. - The 6th line informs the system that you want to use a particular version of paup. If you left this line out, the command on the last line might not work at all, or might run an older version of paup. You can get a list of all available modules using the command
module avail. - The 7th and last line starts up PAUP* and executes the run.nex file. The
-nflag tells PAUP* that no human is going to be listening or answering questions, so it should just use default answers to any questions it needs to ask during the run.
Submitting a job using sbatch
Now you are ready to start the analysis. Type these commands to start your run:
cd ~/pauprun
sbatch gopaup
(The cd ~/pauprun is there just to ensure that you are in the correct directory.)
Checking status using squeue
Note that the --mail commands in your gopaup file will result in an email notification, you can also see if your run is still going using the squeue command:
squeue
If it is running, you will see an entry named pauprun. Here is what it looked like for me:
hpc-ext-2 pauprun $ squeue
         JOBID PARTITION     NAME     USER ST       TIME  NODES NODELIST(REASON)
        645170   general  pauprun   plewis PD       0:00      1 (Priority)
The PD under ST (state) means that my job is pending (not yet running). This job goes so fast that you will be lucky to find it in the running state. If you see no jobs listed when you run squeue, it means your job has finished.
Killing a job using scancel
Sometimes it is clear that an analysis is not going to do what you wanted it to. Suppose that just after you press the Enter key to start an analysis, you realize that you forgot to put in a savetrees command in your paup block (so in the end you will not be able to see the results of the search). In such situations, you really want to just kill the job, fix the problem, and then start it up again. Use the scancel command for this. Note that in the output of the squeue command above, my run had a job-ID equal to 645170. I could kill the job like this:
scancel 645170
Be sure to delete any output files that have already been created before starting your run over again.
While PAUP* is running
While PAUP* is running, you can use cat to look at the log file:
cd pauprun
cat algae.output.txt
Using Cyberduck to download the log file and the tree file
When PAUP* finishes, squeue will no longer list your process. At this point, you need to use Cyberduck or scp to get the log and tree files that were saved back to your local computer. Assuming you left Cyberduck open and connected to the cluster, double-click on the pauprun directory and locate the files algae.ml.tre and algae.output.txt. Select these two files and drag them out of the Cyberduck window and drop them on your desktop. After a flurry of activity, Cyberduck should report that the two files were downloaded successfully, at which point you can close the download status window.
Using scp to download the log file and the tree file
You can also use scp to get the log and tree files that were saved back to your local computer, but, again, if you are happy with Cyberduck you can skip this section. In the Terminal app on your Mac (or the Git for Windows BASH session on your Windows PC), type the following (being careful to separate the final dot character from everything else by a blank space):
scp xfer:pauprun/algae.output.txt .
scp xfer:pauprun/algae.ml.tre .
This assumes you have set up a shortcut: if not, you will need to use the longer version below (being sure to replace username with your own user name on the cluster):
scp username@transfer.cam.uchc.edu:pauprun/algae.output.txt .
scp username@transfer.cam.uchc.edu:pauprun/algae.ml.tre .
These scp commands copy the files algae.output.txt and algae.ml.tre to your current directory (this is what the single dot at the end of each line stands for).
Using FigTree to view tree files
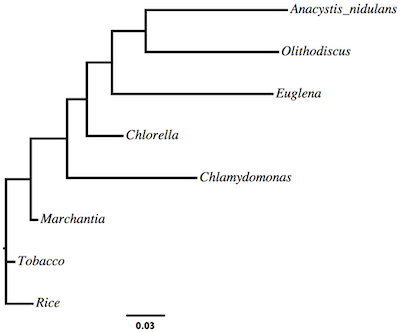
If you do not already have it, download and install the FigTree application on your laptop. FigTree is a Java application, so you will also need to install a Java Runtime Environment (JRE) if you don’t already have one (just start FigTree and it will tell you if it cannot find a JRE). Once FigTree is running, choose File > Open from the menu to open the algae.ml.tre file.
Adjusting taxon label font
The first thing you will probably want to do is make the taxon labels larger or change the font. Expand the Tip Labels section on the left and play with the Font Size up/down control. You can also set font details in the preferences, which will save you a lot of time in the future
Line thickness
You can modify the thickness of the lines used by FigTree to draw the edges of the tree by expanding the Appearance tab.
Ladderization
You can ladderize the tree (make it appear to flow one way or the other) by playing with the Order Nodes option in the Trees tab.
Export tree as PDF
There are many other options that you can discover in FigTree, but one more thing to try today is to save the tree as a PDF file. Once you have the tree looking just the way you want, choose File > Export PDF…
Why have PAUP* create the log file algae.output.txt?
In your pauprun directory, SLURM saved the output that PAUP* normally sends to the console to a file named slurm-645170.out (your file will have a different number, however). You will not need this file after the run: the log command in your paup block ends up saving the same output in the file algae.output.txt. Why did we tell PAUP* to start a log file if SGE was going to save the output anyway? The main reason is that you can view the log file during the run, but you cannot view slurm-645170.out until the run is finished. There will come a day when you have a PAUP* run that has been going for several days and want to know whether it is 10% or 90% finished. At this point you will appreciate being able to view the output file!
Delete the slurm-xxxx.out file using the rm command
Because you do not need the slurm-xxxxx.out file (where xxxx is a placeholder for the job number), delete it using the rm command (the -f stands for force; i.e. don’t ask if it is ok, just do it!):
cd
cd pauprun
rm -f slurm-*.out
You also no longer need the log and tree files because you downloaded them to your local computer using PSFTP:
rm -f algae.ml.tre
rm -f algae.output.txt
It is a good idea to delete files you no longer need for two reasons:
- you will later wonder whether you downloaded those files to your local machine and will have to spend time making sure you actually have saved the results locally
- our cluster only has so much disk space, and thus it is just not possible for everyone to keep every file they ever created
Tips and tricks
Here are some miscellaneous tips and tricks to make your life easier when communicating with the cluster.
Command completion using the tab key
You can often get away with only typing the first few letters of a filename; try pressing the Tab key after the first few letters and the command interpreter will try to complete the thought. For example, cd into the pauprun directory, then type
cat alg<TAB>
If algae.nex is the only file in the directory in which the first three letters are alg, then the command interpreter will type in the rest of the file name for you.
Wildcards
I’ve already mentioned this tip, but it bears repeating. When using most UNIX commands that accept filenames (e.g. ls, rm, mv, cp), you can place an asterisk inside the filename to stand in for any number of letters. So
ls algae*
will produce output like this
algae.ml.tre algae.nex algae.output.txt
Man pages
If you want to learn more options for any of the UNIX commands, you can use the man command to see the manual for that command. For example, here’s how to see the manual describing the ls command:
man ls
It is important to know how to escape from a man page! The way to get out is to type the letter q. You can page down using Ctrl-f, page up through a man page using Ctrl-b, go to the end using Shift-g and return to the very beginning using 1,Shift-g (that is, type a 1, release it, then type Shift-g). You can also move line by line in a man page using the down and up arrows, and page by page using the PgUp and PgDn keys.
Xanadu information
You can find a lot of great information about the Xanadu cluster at the Computational Biology Core web site. In particular, the first tutorial named “Understanding the UConn Health Cluster (Xanadu)” may be particularly useful.